Category Archives: Light Lunches

Perfect Butter Bean Salad & 5 Reasons to Eat Pulses

Last week was pretty extraordinary; a trip to Rome for my appointment as The United Nations Food and Agricultural Organisation European Special Ambassador for The International Year of Pulses (that’s quite something to fit on a business card!)

 ©FAO/Giulio Napolitano 26 May 2016, Rome Italy – International Year of Pulses (IYP) Special Ambassador Jenny Chandler and FAO Director-General José Graziano da Silva. International Year of Pulses (IYP) nomination ceremony of FAO IYP Special Ambassador for Europe Jenny Chandler, and launch of IYP publication, (Sheikh Zayed Centre), FAO Headquarters. 

The ceremony was both nerve-wracking and exhilarating, I’m quite used to public speaking but I can usually hide behind a frying pan and do a bit of stirring if I’m lost for words. Thankfully everything ran smoothly and it was an absolute honour to meet the UN FAO Director-General, José Graziano de Silva and dozens of other inspiring people who work in this huge organisation leading international efforts to end world hunger.

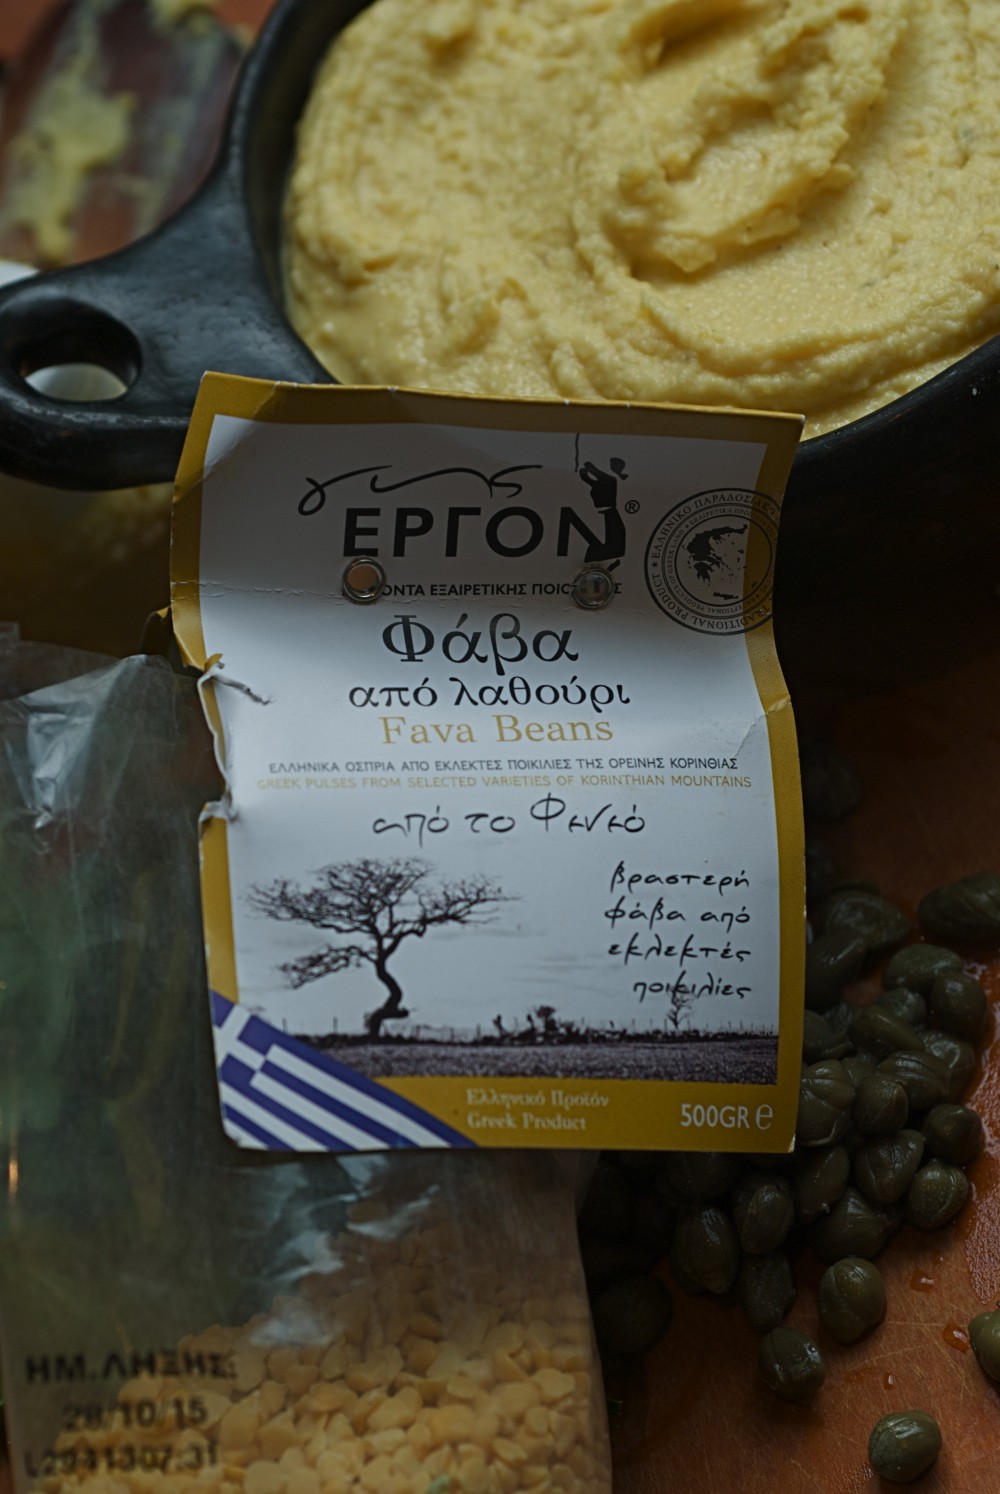
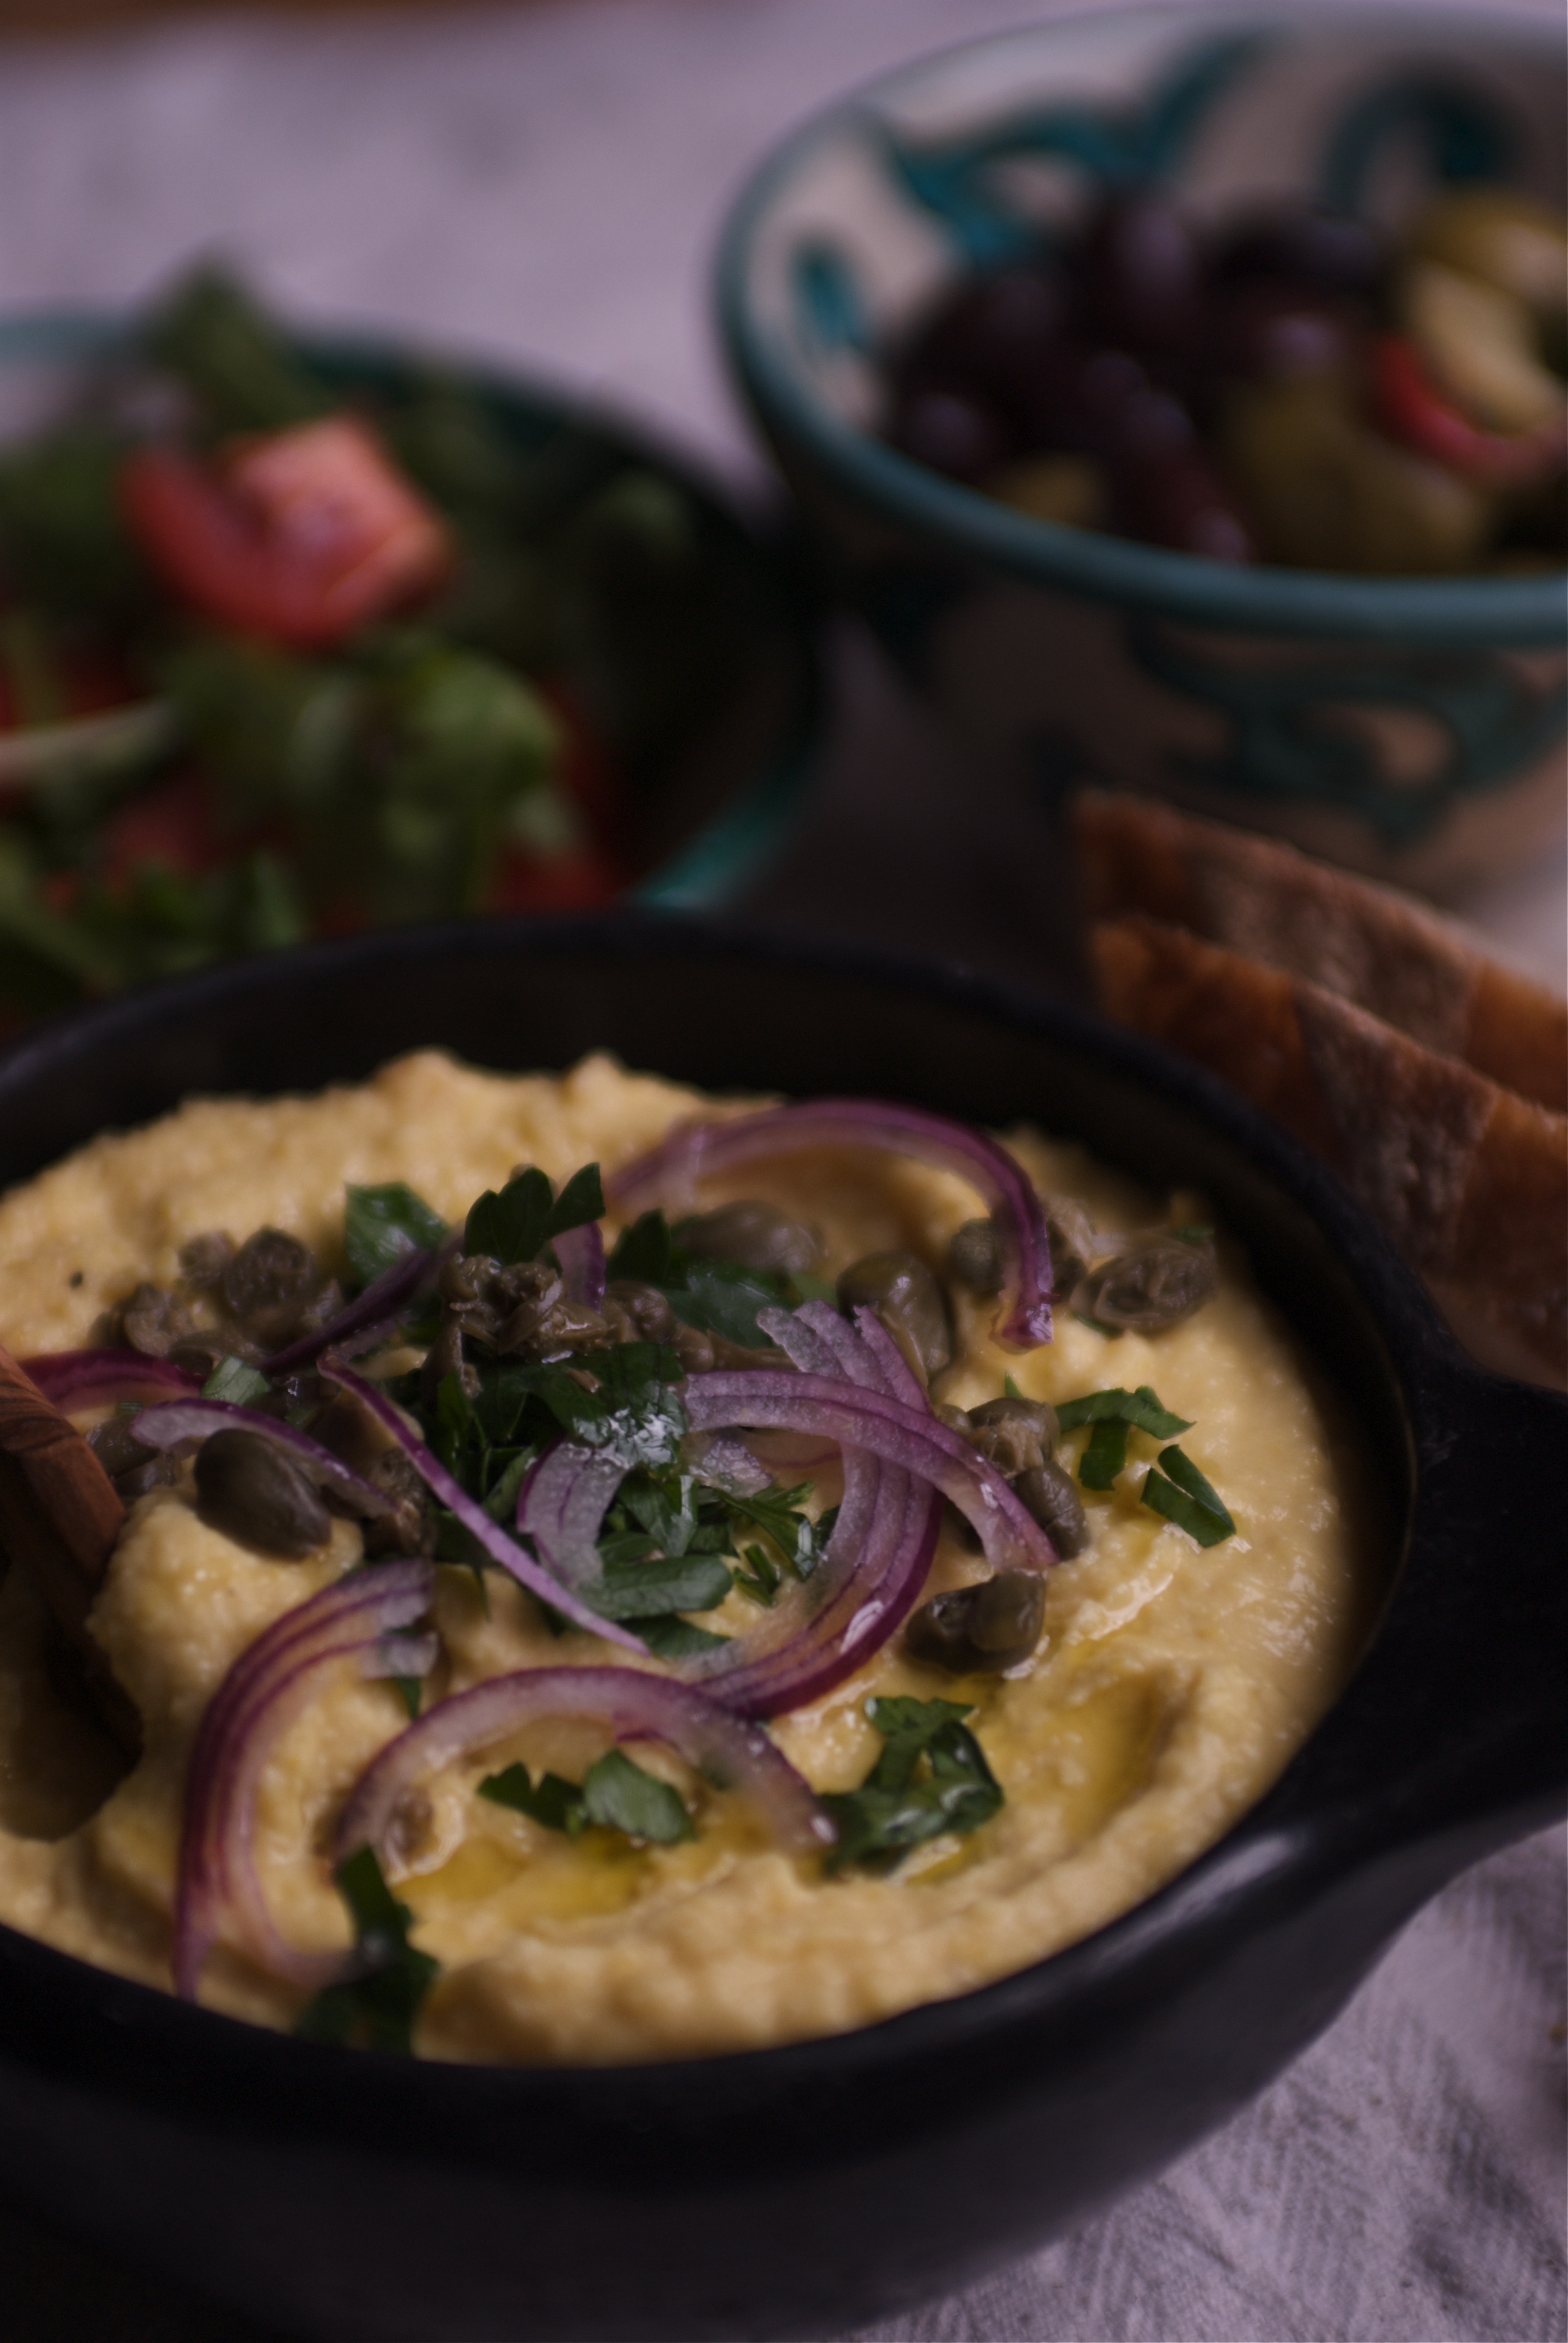
I’ve been enthusiastically spreading the word about just how good pulses are to eat for years and now I have even more reason to do so. Firstly I’d like to say that, given the right treatment, pulses are one of my favourite things to eat …..ever. I think it can sometimes be counterproductive to bombard people with too many nutritional and environmental reasons to eat something if we don’t remind them that they taste amazing too. There’s that nagging doubt – is this going to taste like that 1970’s hippy-healthfood?  The answer’s no, with a little love and attention. Think dal with spicy tarka, slow cooked cassoulet, freshly fried falafel or black bean burritos.

So here’s a great salad, ideal for the lunch box or just for a simple supper. I wrote the recipe for the Meat Free Monday website, a great source of vegetarian recipes. Now I’ll be straight, I’m no vegetarian however we probably only eat fish or meat a couple of times a week. I’d rather eat plenty of relatively cheap pulses and vegetables and then once in a while splash out on carefully sourced meat or fish as a treat…..better not just for our own health but that of the planet too.

Butter bean and cauli

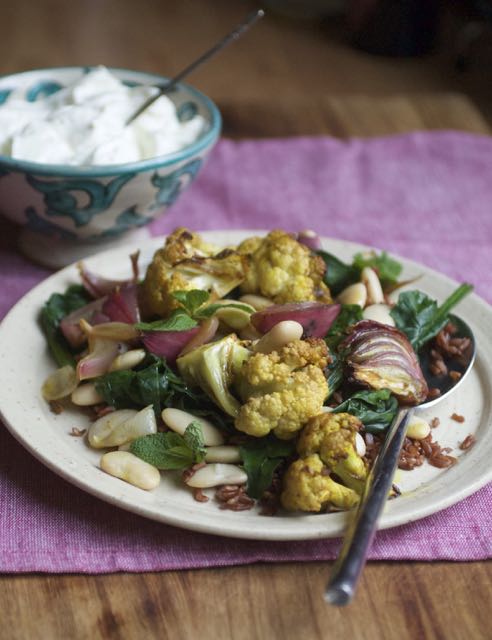
Spicy Roast Cauliflower, with Butter Beans and Red Rice

The textures work beautifully here: crunchy cauliflower, creamy beans and the chewy bite of the red or brown rice.

Serves 4

1 large head of cauliflower, divided into small florets
Juice of 1 lemon
1 tbsp medium curry powders s
2 red onions
4 tbsp olive oil
500 g home-cooked or 2 x 400g can of butter beans, drained
2 tbsp cider vinegar
25 g butter
salt and pepper
100 g red Camargue rice (or brown rice)
500 g spinach, washed
150 ml Greek Yoghurt
A good sprig of fresh mint

Preheat the oven to 200 c/gas mark 6

Rinse the cauliflower and then toss it around in the lemon juice. Place the florets in a roasting tray and sprinkle with the curry powder.

Peel and chop each onion into six, (individual slices will burn). Add the onion to the cauliflower and pour over the olive oil.

Roast in the oven for about 30 minutes, turning everything once until nicely golden and beginning to caramelise. Add the butter beans, cider vinegar and butter to the vegetable pan, place it back in the oven but switch off the heat, the idea is to heat through rather than cook the beans.

Whilst the vegetables are roasting rinse the rice, place it in a pan, (ideally the base of a tiered steamer), of cold water with a pinch or salt, bring up to a boil and then cover and simmer until tender. Drain.

Now steam your spinach. I just place mine in a steamer over the rice, but you may prefer to use a separate pan. Steam the spinach until it just collapses and drain (there is no need to squeeze it here as it should remain really juicy).

Add the rice and spinach to the vegetable pan and season well. Add more vinegar, chilli, or salt to taste.

Serve with a spoonful of Greek yoghurt and a sprinkling of mint.


5 Reasons to Eat Pulses

Good for you: High in fibre and complex carbs (keeping your digestive system healthy and you feeling satiated and full for hours – less trips to the biscuit tin!)

Good for the Budget: A really cheap alternative to meat, fish and dairy as a source of protein – remember to eat cereals such as rice or wheat too to maximise pulse potential.

Quick and easy: Whether you decide to cook up a big pot and use the pulses for a few days in a variety of different dishes or just to open a can, cooked pulses are fabulously quick and easy ingredients to whip up into a meal – check this blog or my book Pulse for dozens of ideas.

Good for the land: Pulses actually enrich the soil as they grow, fixing Nitrogen from the atmosphere into the soil, reducing the need for fertilisers.

Good for the planet: Pulses have one of the lowest carbon foot prints of any crop, they require less water to grow and are vitally important in areas of the world where drought and extreme heat make farming incredibly challenging.

In short they’re a wonder crop……….. EAT MORE PULSES!


Chickpea Salad and Other Stories

Last week we celebrated The Bristol Food Connections Festival and I was in a whirlwind of cooking (plenty of pulses), teaching, writing, cooking and a bit of gallivanting too. Of course the very mention of the “wind” word will have probably unleashed a bit of school boy humour amongst some of you and I’ll address that at the bottom (oh dear!) of the post.

Food Connections

My demo’ at the festival focused on chickpeas (perhaps my favourite pulse of all, and certainly the variety I use the most) and I had decided, rather bonkersly, to cook 10 recipes in an hour. I often feel that people don’t realise how versatile and easy chickpeas are to use and so, with the help of nine year old Imi, we flew through loads of simple ideas. We did also have some help from the wonderful Clare Hargreaves and Steve Ashcroft – thanks so much to both of you.

Some of the recipes are on my blog already, just click on the links for recipes. We kicked off with farinata , the gram (chickpea) flour flatbread which is super cheap and incredibly moreish (even Gwyneth has included a recipe in her latest cook book, she uses the French name Socca,…. love the idea of putting sardines and tomatoes on the top). Our simple  soup has been a go-to-recipe of mine for years, a real store-cupboard standby, with chilli and lemon juice. The zingy  Southern Indian chickpea stir fry  is a winner if you’re up for some Indian flavours . I only cooked one dish with meat and that was a simple one pot supper dish using a little chorizo , it’s a recipe that really does demonstrate my belief that a small quantity of well-sourced meat can feed a crowd when you cook with pulses. So those are your bonus recipes, and I’ll do my best to post all of the dishes I cooked over time, but today I wanted to talk about salads.

I’d quite happily eat salad every day of my life as long as it was more than a pile of leaves. Nowadays many of the hipster cooks and chefs seem to refer to a large plate of cold goodies as a buddha bowl or wellness plate, I just call it salad. It’s a great option instead of the daily sandwich that so many of us snatch at lunchtime, as long as it tastes fab’, fills you up and keeps you going for the afternoon. As you may know pulses are packed with fibre, are digested slowly and will keep you feeling satisfied and energised for hours. Another upside of chickpeas, beans and lentils in a lunch box is that they actually benefit from a few hours sitting in the dressing, herbs and spices that you may have decided to add. I could bang on about the low fat, no cholesterol, the protein ( when accompanied by grains, nuts or dairy), manganese and folate that chickpeas bring onboard but sometimes singing the health benefits of an ingredient makes people imagine that it will be a trial to eat. THIS SALAD IS DELICIOUS; one of my all time favourites from my book Pulse. I’ve taken a cheeky shot – of the salad pic’ by the fabulous Clare Winfield in my book (I’m up against it, I have a book launch on Wednesday and everything to get ready, so I do hope you’ll forgive).


image

Chickpea, Beetroot and Feta Salad.
Serves 4

1/2 red onion, sliced
2 tbsp red wine vinegar
4 tbsp extra virgin olive oil
3 cloves of garlic, peeled and halved
500 g/ 1 lb home cooked or 2 x 400g/14 oz tinned chickpeas, (well rinsed and drained)
200 g/ 7 oz feta cheese, cut into large 2 1/2  cm/1 inch dice
1 tbsp sesame seeds
1 tsp fennel seeds
100 g/4 oz baby spinach or other salad leaves
1/2 cucumber, diced
a large bunch continental parsley, chopped
About 20 mint leaves
2 small cooked beetroot (vacuum packed or home-cooked) , roughly diced
Seeds from 1 pomegranate
salt, pepper, wine vinegar and extra virgin olive oil to taste.

Soak the sliced onion in the vinegar, it will turn a glorious fuschia pink and become softer and more digestible.

Gently warm the olive oil and the garlic in a saucepan for about 5 minutes. The idea is not to fry the garlic but to infuse the oil and soften the the garlic’s flavour. Remove the pan from the heat and take out the garlic, it will be soft by now, chop it finely and return it to the pan with the chickpeas. Stir them around in the warm oil, season with a little salt and pepper and then set aside to cool.

Toast the sesame and fennel seeds in a frying pan until the sesame seeds dance around and turn gold. Tip the seeds onto a plate and carefully toss the feta around, covering each dice in a speckled crust.

Place the onion, chickpeas with their garlic oil, salad leaves, cucumber, parsley and most of the mint in a bowl and mix carefully. Now add the feta and beetroot and toss carefully just a couple of times otherwise the entire salad will turn a milky pink. Taste and adjust the seasoning if necessary.

Sprinkle with pomegranate seeds and a few mint leaves and serve with toasted pitta or some fabulous sourdough and a dash of olive oil.

How about?
Adding  a few pitted Kalamata olives
Some roasted pistachios along with the pomegranate
Grilled or char-grilled sliced aubergine
Chopped coriander instead of the mint

TIP: Warming the chickpeas in the garlicky oil makes them sing, if you’re not keen on garlic then try infusing with lemon zest or spices. This technique will make a difference to any beans or lentils, especially if they’ve come out of a tin

The Wind Factor

I’m always extolling the virtues of legumes and yet I’ve still to address the wind problem on my blog, it’s probably because it doesn’t really affect me (there are also plenty of things that help reduce the flatulence in any case ).

SO, why the wind? (Here’s a quote from my book – Pulse) “Legumes contain certain indigestible carbohydrates, the most troublesome being the oligosaccharides, that can’t be dealt with by the digestive enzymes in the stomach. So these carbohydrates pass through the upper intestine largely unchanged and are finally fermented and broken down by harmless bacteria in the lower intestine. This rise in bacterial activity results in gas. There’s also the high fibre factor; if your normal diet is low in fibre then a sudden rise will cause gas too.”

And what to do about it? Firstly, your body will gradually adapt to eating more pulses and fibre and then any wind will become less of an issue.
Secondly, the great pulse eaters of the world offer up plenty of calming options.
-You can add a small piece of Kombu seaweed to the beans as they cook as the Japanese do (available dried next to the Miso etc in health food shops)
-The Mexicans add a few leaves of epazote to the pot (available dried on line at Sous Chef  along with almost any other ingredient that you need to track down)
-Indians use asafoetida, cumin, turmeric or fennel in their dals and curries
-Italians swear by fennel and sage.


AND THE NEWS …….. COOL KIDS COOK is out this week

and of course there are a few pulse recipes thrown in, including 4 variations on a quick bean salad, ideal for the lunchbox. You can read more about it on my blog here


Wild Garlic and Tomato Cannellini

Two blog posts in one week is a record for me but I must get this out to you whilst the wild garlic is still in its prime……

School holidays, and just the time for a National Trust expedition, our membership (thanks sis’) is such a boon, if we’re away on holiday or visiting friends there’s always somewhere nearby to explore. This week it was a day trip from Bristol with old friends to Newark Park, near Wooton-under-Edge (close-ish to Stroud). Monday’s weather forecast was pretty grim but you can always bet on a quiz for the kids in the house and a good café to hole up in if things get really wet.

After a good look round the extraordinary house (austere Tudor hunting lodge with centuries’ worth of additions, brought back from rack and ruins in the 1970’s by a Texan tenant) we set off into the estate. I have NEVER seen so much garlic, all absolutely in its prime (now’s the time to pick, when the leaves are young and tender, before those lacy white flowers appear)

image

And, before anyone suggests that we shouldn’t have been picking, it was all legit; we were given brown paper bags by the guy at the ticket office and invited to help ourselves, as long as we gathered carefully and didn’t uproot any bulbs. The smell was intoxicating as we foraged and even more so in the car on the way home.

Back in the kitchen I thought I’d give Imi the challenge of single-handedly putting lunch together (with just a little bit of instruction). This dish is so super-simple and keeps well for a couple of days in the fridge.

Wild Garlic and Tomato Cannellini

Jenny Chandler Cannellini
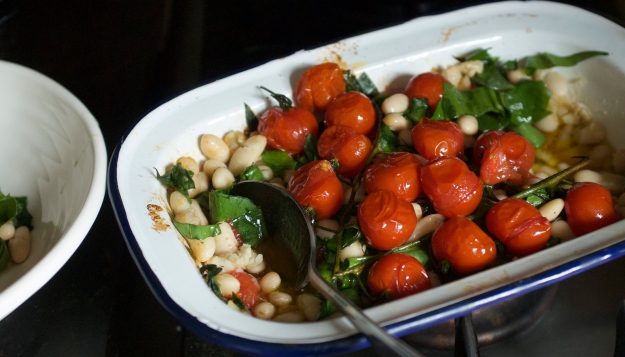
200 g (ish) cherry tomatoes on the vine
4 tbsp extra virgin olive oil
Large handful of wild garlic leaves
2 x 400g cans of cannellini beans (drained)
Splash of white wine
salt and pepper

Switch the oven to about 180ºC

Put the tomatoes in the oven with the olive oil in a heatproof serving dish and leave for about 20 minutes until they have split and softened.

Meanwhile wash the garlic leaves (there were plenty of dogs being walked along our path!) and then chop up roughly.

Use a fork to knock/scrape the tomatoes off the vine (a vine does look good on the top so you might keep one back). Stir in the garlic, beans, wine and season with a bit of salt and pepper.

Warm the beans through in the oven for about 10 minutes, long enough for the garlic to wilt.

Serve warm from the oven – you can eat the beans just as they are or you could

Try
-Doing the delicious double carb thing and serving with pasta (pile on some parmesan or pecorino too).
– Serving on sourdough toast, maybe with a bit of goat’s cheese.
– Eat alongside some fab’ sausages, lamb or fish.


So get your kids cooking, or throw something together yourself – it’s child’s play (sorry, had to be done) And for lots more inspiration there is , of course, a very handy book coming out in just a few weeks time. You could even click here to pre-order Cool Kids Cook !


Black Badgers and Blood Oranges

Today’s bright and chilly; I’ll try to whisk myself along to The Lido for an outside swim once I’ve written this post. I’ve no problem with piling on the long johns and stuffing some extra fleece into the guinea pigs’ bed box, the cold feels invigorating and the light is a joy. Dingy, grey days are another matter; I’m often convinced that I have Seasonal Affective Disorder, that awful drained and lethargic feeling during the dark months of winter. I have a S.A.D. lamp that I switch on beside my desk on the gloomiest of days, I’m not sure that it makes too much difference but at least I feel that I’m taking control of the situation.

People often talk about comfort food in dismal weather but actually what I need is a serious pepping up and so a salad packed with good stuff such as oranges, avocado and pulses is just the thing. It’s not that I would shun a doughnut (particularly if it happened to be a Borough Market Bread Ahead doughnut – once tasted never forgotten) but if I put together a really vibrant salad of fabulously tasty bits I will enjoy it just as much, yes I promise you, I really will. That’s just it, pulses are often considered rather stodgy and worthy, they can be, but given the right treatment they taste divine.

In Britain we produce vast, vast quantities of peas. Frozen green peas are the nation’s favourite veg’ and I’m not knocking them at all – sweet, quick, crowd pleasing and great for soups, (try this absolute cracker from Diana Henry), but it’s easy to forget that historically all the peas we grew were dried and cooked up into staples such as the  “pease pudding” we all know from the nursery rhyme. We get through a fair amount of marrowfat peas too; matured on the stem until starchy and rotund, and particularly popular for mushy peas. Nigella’s recipe for marrowfat pea and avocado hummus is inspired (just whizz up 1 ripe avocado, a drained 300g can of marrowfat peas, 1/2 a clove of garlic, juice of 1/2 a lime – then season with salt, pepper and more lime if required) Dried, split yellow and green peas make great soups – particularly the classic pea and ham soup  I wrote about on The Borough Market blog.

Today I want to tell you about my all-time favourite pea, the Black Badger, and not for the first time, here’s a “vintage” post (there’s an irritating title for yesterday’s news). Black Badgers or Maple Peas have plenty of other names: Carlin or Carling Peas in Yorkshire, Black Peas in Lancashire and Grey Peas in the Black Country.

The peas are said to have flourished in English monastery gardens hundreds of years ago, with their beautiful blooms. Geordie folklore tells a tale of siege and starvation back in 1327 when the people of Newcastle were saved by a shipload of Carlin Peas from Norway, other sources talk of the peas being gathered from a Spanish shipwreck  in Elizabethan times. Whatever their history these nutty little peas have only really been appreciated in more recent times up North. “Parched Peas” (just slow-simmered and served with salt and vinegar) are a Lancashire classic on Bonfire night whilst you’re more likely to be eating your Carlin Peas in Yorkshire on the Sunday before Palm Sunday  ( so best go buy some) with a little butter stirred in.

I like to cook up a pot of Black Badgers (they take about 45 minutes) and throw them into  salads, soups or stews. Try using them in the place of a chickpea in any recipe; they’re chameleons like all legumes, soaking up flavours and infinitely adaptable. I felt the need for a winter vitamin hit and never take any persuading when it comes to blood oranges. The citrusy sweetness is the secret to this salad, offsetting the hearty nuttiness of the peas and the richness of creamy avocado. Sprouted radishes add an almost mustardy nose-rush and then there’s plenty of coriander too. All in all the salad has attitude, that’s the best way with pulses.

Blood orange and Black Badgers
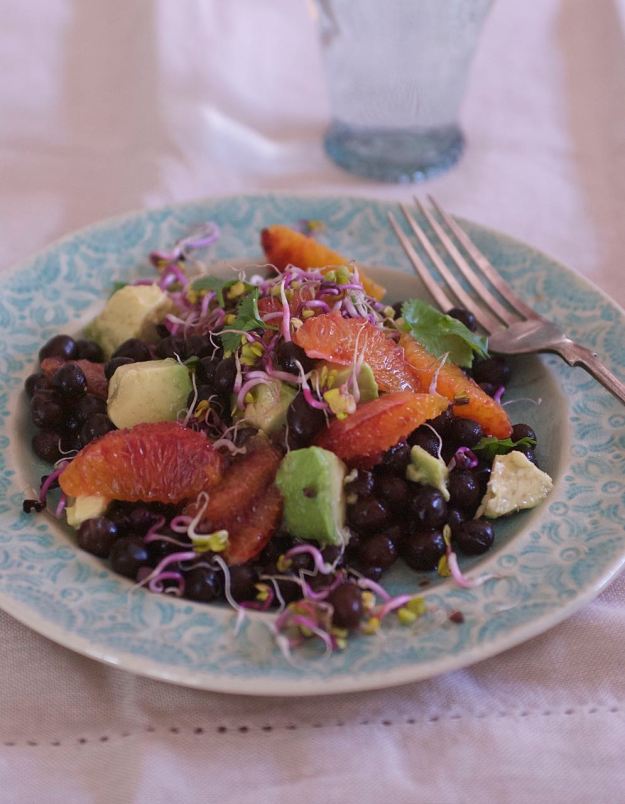
Black Badger and Blood Orange Salad

Serves 4 (as a light lunch, maybe with a bit of bread?)

600 g cooked black badgers, drained
4 blood oranges, peeled and segmented (reserve the juice)
2 avocados, flesh cut into chunks
3 tbsp extra virgin olive oil
1-2 tbsp cider vinegar
Salt and pepper to taste
1 handful of sprouted radishes (you could use sliced, feisty radishes instead)
Fresh coriander, leaves from 2 good sprigs
1 tbsp black sesame seeds (if you have them, or white or even a few sunflower/pumpkin seeds)

So, drain your badgers and put them in a bowl with most of the orange segments.

Keep the orange juice to toss the avocado around in (then it doesn’t oxidise and go black)

Mix together the dressing, taste and balance it up and then tip over the badgers. Taste again pulses need to be well seasoned and love vinegar/acidity.

Add the avocado and any orange juice, the remaining orange segments, radishes, coriander and sesame seeds but DON’T stir (or the creamy avocado will make your glistening peas look murky and sad).


Cooking Black Badgers

or any whole dried peas for that matter

I soak my peas overnight, drain and then cover with plenty of cold water. Simmer for about 45 minutes ( I put a tablespoon of bicarbonate of soda in with 500 g dried beans to spend up the softening process as an experiment – yes they cooked marginally quicker and are definitely a bit softer and creamier than my last batch) Marrowfat, green or yellow peas may take a little longer to cook.

Leaving the peas overnight in the fridge in their cooking water has given the peas a darker look – more dramatic black than brown now.

You may have a local source for Black Badger Peas, I can find them in a number of Bristol stores, if not you can track some down on line at the wonderful Hodmedods  And, a little advice, don’t just stick with the Badgers, Hodmedods sell a whole range of fabulous British  Peas, beans and quinoa. The roasted peas are my current desert island snack.

No Black Badgers?

A black bean would work nicely (I love the contrasting colours here) as would a pert lentil (of the Puy/ French green style rather than softer brown) or even a chickpea. I know that I’ve said it before but here we go again…. legumes are wonderfully versatile.

If you’d like to learn more about cooking pulses how about coming along to my day workshop ?

Pulse: At the heart of the kitchen 
The Bertinet Kitchen on Saturday May 7th


Roast Vegetable Hummus and the Simplest Flat Bread Ever

Okay, it’s been a while and sadly I’m not about to regale you with fabulous tales of holidays and adventures that have filled my days. It’s just that Peter (the husband) is away in Antarctica for a few weeks and my life seems to be a hectic (read chaotic) combination of working all over the place at funny hours (a result of being freelance that I usually embrace) and farming Imi out to wonderfully supportive family, friends and neighbours (three cheers for “Spare Granny” Sasha) at both ends of the day.

The amazingly bright autumn weather (not today – the S.A.D. lamp is definitely on), a few trips to The Bristol Lido to swim outside and some very special one-to-one time with Imi have thankfully made the chaos pretty wonderful too. I feel so blessed living in Bristol where I took these pictures just 5 minutes walk from the house. Last Sunday, the 1st of November, just felt like a bonus, an almost summery day, before we hit the colder weather – everyone was out (and I remembered that I really, really need a dog).

One of my Autumn highlights has to be the day spent at Victoria Park Primary School, in Bristol, helping with their Healthy Schools Week. I was working with Ramona Andrews: a school Mum, food writer, social media guru, producer (she’s a talented lass) and we a ball (a tiring one, but oh so rewarding). The idea was to get kids cooking, tasting and experimenting with simple recipes that happened to be healthy too, rather than the didactic approach.

With over 30 kids at a time, in the school art room, it wasn’t going to be individual soufflés so we settled on flat breads and hummus. It was all about tasty, simple and accessible recipes that the kids would most likely eat too and with Halloween looming we thought we’d throw some roasted pumpkin into the hummus. The room was filled with great wafts of garlic, cumin, baking bread and lots of noise (good noise, enthusiastic, excited noise).

One thing that I’ve learnt about cooking with children is that everyone wants, and needs, to be busy for every available second (I so, so appreciate you school teachers – it’s knackering). We had plenty of grating going on to keep everyone gainfully employed and made a massive bowl of salad. Radishes, beetroot, carrots, cucumber, apples, pears, seeds, herbs, lemon zest – it all went in, and of course there were a few doubters (some rather more vociferous than others) but pretty much everybody tried the end result and, best of all, most of them loved it.

So here you have my recipes from the day and though I do admit to buying hummus sometimes, and pitta bread too, this reminded me how simple, cheap and adaptable they are to make. The children were amazed at how easy it is to prepare the basic flat breads with plenty of scope to play around sprinkling with different spices They’re ideal for baking with some eager little helpers but worth throwing some together for yourself too.

Halloween may be over, pumpkin fever a thing of the past, but there are plenty of squash around in the markets and shops to experiment with. The texture is fabulous in hummus and the slightly nutty, caramelised flavour works well with Middle Eastern spicing or you could try some rosemary instead. The children devoured this, one even suggested that it would be good for “dipping KFC chips in”! (you can’t win ’em all) but the best thing was the palpable excitement  at eating something they’d prepared.

image

Hummus

1 x 400 g can of chickpeas, drained
1 clove garlic, crushed
1 tsp ground cumin (roast and grind your own if you have time)
juice of 1/2 -1 lemon
4 tbsp extra virgin olive oil
A pinch of salt and ground black pepper

Whizz up the the chickpeas in a food processor with the garlic, the juice of 1/2 the lemon and most of the cumin.

Blend for a moment or two before adding the olive oil. If the hummus is very stiff you can add 1-2 tablespoons of water. Blend again until you have a nicely textured, rather than smooth, paste.

Season with the black pepper. Have a taste and decide whether you want to add more lemon juice.

Coriander or parsley are great stirred in at the last moment (no earlier or your hummus will look a murky khaki colour.

Roasted Vegetable Hummus

600 g carrots or pumpkin, peeled and roughly chopped
2 tbsp olive oil
pinch of salt
1 x hummus recipe above

Pre heat the oven to 200ºC, fan oven 180ºC, gas mark 6

Put the carrot or pumpkin pieces into a roasting tin and add the olive oil, tossing to coat the vegetables and sprinkling with a little salt. Roast in the oven for 30 minutes, or until they’re beginning to brown and caramelise.

Add the vegetables (hot or cold, it doesn’t matter) to the food processor  (or whizz with a stick blender), purée until smooth and then stir in the hummus.

Tip: Try using other vegetables such as roasted peppers, onions or aubergines too.

Simple Flat Breads (12)

250 g self raising wholemeal flour
pinch of salt
1 tsp baking powder
250 g natural yoghurt

Just mix everything together in a large bowl, stirring with a wooden spoon.

Squash the dough around in the bowl with your hands until it feels smooth and then roll the ball in a little four to stop it sticking the bowl. Cover the bowl with a plate or tea towel for at least 20 minutes

Divide the dough into 10 (easiest to chop in half and then cut the halves into 5 each- get the Maths going) Roll out until they are the thickness of a pound coin and bake in the hottest oven possible or cook on a ridged griddle until baked through..

Brush with oil and herbs ( try za’atar : sumac, sesame, tried thyme and salt) or garlic butter and eat straight away.

Grated Fruit and Vegetable Salad

You don’t need a recipe really but here are a few suggestions – a great moment to empty the veg’ basket and fruit bowl. It’s a fab’ way to introduce new flavours to kids, pile in plenty of the familiar and then just a little of something new.

Dressing made with lemon juice, olive oil and seasoning1 apple/pear
1 beetroot red or golden or even candy-striped (the kids loved these)
2 carrots
1 -2 sticks of celery
Fresh herbs such as parsley, mint, dill or coriander.

Put your dressing into a bowl and grate the r fruit and vegetables into it (turning so that they don’t get a chance to brown)
Mix everything together ( it’s best to stir in beetroot at the very end or you will end up with a Barbie-pink salad – you may want to wear gloves whilst you are grating).

Taste and season , then add nuts, seeds, herbs whatever you fancy.


Sundal Accra – A Bonus Spicy Chickpea Recipe!

OOPs I did it again! In the carefully selected words of Imi’s favourite Britney Spear”s number.

I can just about write one blog but managing to write two is almost beyond me. I decided to set one up for our wedding guests and have, for the second time, managed to post some completely irrelevant information to hundreds of food followers and chickpea enthusiasts- Sorry if you’re bewildered – I’ve taken it down now and you have a very quick post in it’s place!

So it’s not all bad since I’m going to reward you with one of my favourite recipes from Pulse (Oh and what a fine excuse to mention my book once more)

Pulse Jenny Chandler

Southern Indian Chickpeas and Coconut
Sundal Accra

There are so many amazing Indian snacks made with pulses to choose from, it was the pure simplicity of these chickpeas that caught my eye. Then, once eaten never forgotten, they make a great little nibble to serve before a curry.

This snack is traditionally served outside the temples of Southern India during the Hindu festival of Navratri. Nowadays it’s tricky tracking down whole coconuts in Britain but you’ll certainly know what to do next time you score on the coconut shy at the local fête. I’ve used desicated coconut but if you do find a fresh one in an ethnic store it is oh so much tastier.

1 tsp vegetable oil such as rapeseed, sunflower, ground nut or coconut oil
1 tsp black mustard seeds
1 green chilli, very finely diced
1 tsp fresh ginger, very finely chopped
5 curry leaves (optional)
1/2 tsp salt
1 tbsp urad dal or very unorthodox red lentils (optional)
250 g home-cooked or 1 x 400g tin, drained and rinsed chickpeas
4 tbsp freshly grated coconut or 2 tbsp unsweetened desiccated coconut

A handful of fresh coriander, finely chopped

Take a large frying pan and heat up the oil, add the mustard seeds and wait until they begin to splutter and pop about.

Now throw in the chilli, ginger, garlic, curry leaves, salt and raw dal (or lentils) if using.

Wait for the aromas to burst out of the pan and the dal/lentils to begin crisping up and then stir in the chickpeas.

Remove from the heat and stir well, add the grated coconut and dive in.

Scrumptious warm or cold.

Deconstructed Minestrone

Minestrone SaladIt does sound seriously poncey I know, but this salad came about quite by mistake and not as some highfalutin cheffy notion. A couple of weeks ago I was running a workshop at Imi’s Primary School with an entire class of Year 3 (7-8 year olds) and had planned on making a huge minestrone soup showcasing some of the vegetables picked in the school garden. Of course that particular day turned out to be the heatwave of the century (it did only last a day) and hot soup really did not fit the bill at all. SO, deconstructed minestrone it was and how tasty it turned out to be too.

I’ve started teaching regular cooking workshops with the help of some enthusiastic parents at my daughter’s primary school; it’s quite a challenge as we’re working in the dining room, have just one small oven and no individual hobs as yet. Interestingly these limitations forced me to really think how to go about the sessions and now we have a great formula. In each class we have a core recipe such as a bulgur wheat salad, or Turkish borek (little folded filo pastries) or in today’s case minestrone with about 4 or 5 key ingredients and a few basic instructions. Then we let the kids loose on a whole variety of other vegetables, herbs, cheeses, spices and seasonings (or any other appropriate bits) that I’ve arranged on a huge table. The children work in small groups on their recipe; it’s quite extraordinary to watch the peer pressure and competitive spirit at work -suddenly previously green-phobic kids are diving into pea shoots, raw courgette, dill and avocado.

Perhaps the most gratifying  thing about our Food Group sessions is the parental feed back, some children are even sending their mothers off with shopping lists so that they can reproduce the simple meal back at home, others are being more adventurous in their food choices. There’s no doubt that cooking is key to getting children excited about eating healthy food (it’s not just about making chocolate brownies and cup cakes – I could rant now but we’ll leave that for another day)

But back to the Minestrone –  a classic Italian dish that translates as “big soup”, it varies with the region and the season but is quite definitely never a salad! So get off my back Italophiles.  I know that it doesn’t really make sense but the ingredients (with the obvious omission of the stock) are basically the same – just raw rather than cooked.  This “Deconstructed Minestrone”  is great way of plumping up a summer salad into a substantial lunch dish and also using up any random vegetables that are good eaten raw. It’s up to you how many ingredients you throw into the mix.

Deconstructed Minestrone.

Minestrone Jenny Chandler

70’s Style Still L ife

The Base
250 g cannellini or haricot beans ( 1 x 400 g can of  beans drained or home – cooked – it’s up to you)
100 g tiny pasta e.g.  orzo (like tiny rice), acini de pepe (literally pepper corns) or stellette (little stars )
250 g ripe, tasty tomatoes cut into bite-sized pieces
3 or 4 spring onions, trimmed and finely slice
A large handful of basil leaves, ripped into small pieces
Shavings or parmesan or pecorino cheese

The Dressing
Juice of 1 lemon
5 tbsp extra virgin olive oil
Salt and pepper to taste

Optionals
Fresh peas straight from the pod
Courgette, cut into very fine slices (yes, raw courgette is delicious and a winner with the kids)
Celery, chopped finely
Red or yellow pepper cut into tiny dice
Carrot, diced finely
Parsley, dill, mint, oregano, rocket, pea shoots, baby spinach
French beans or baby broad beans, blanched until tender.

Rinse the cannelloni or haricot beans and place them in a large salad bowl.

Boil the pasta in salted water until just “al dente” it’s pretty quick with all these tiny, soupy shapes so keep an eye. Drain the pasta and add it to the beans.

Now add the remaining vegetables and dressing to the bowl, holding back on tender herbs, salad leaves and the cheese shavings until you are just about ready to serve.

The salad only improves with a few extra hours in the bowl with all the flavours getting to know one another.

You could add tinned tuna (leave out the cheese), anchovies, capers or olives to the mix but now we are really straying from the minestrone roots.


Sadly, hot soup seems the better option today as I sit at my desk in summer frock and flip flops desperately trying to think sultry sunny thoughts. We’re off to W.O.M.A.D. ( a fabulous music festival) tomorrow, the wellies and not-so-fashionable rain ponchos are by the front door but I’m crossing my fingers.


Frugal but Fab’ Chickpea, Chilli and Mint Soup

Today’s recipe is cheap to make, has very few ingredients and only takes about 20 minutes from start to finish. It’s also one of those dishes that seems to taste so much better than it ought to; the whole, quite simply is, better than the sum of its parts.

Jenny Chandler Frugal Chickpea soupI’ve chosen this fabulous soup recipe for a couple of very good reasons. As you know if you’re a regular reader of my blog, I am rather obsessed with pulses, chickpeas in particular. Secondly I’ve been challenged by the guys at The Hunger Project to come up with a supper recipe that costs under 33 pence per serving to tie in with World Hunger Day on 28th May. This part of the My Voucher Code World Hunger Campaign – you can take a look and see if you’d like to get involved too.

I have to say that I am constantly badgered by emails asking me to support “Days” and quite frankly most of them annoy the hell out of me. So someone just decided that we should have a “National Sandwich Week”, a “World Doughnut Day” (yes it does exist!) or worse still “Happiness Day” (for God’s sake what happens if your dog’s died or you’ve just received a parking ticket?- it’s ridiculous) However, (rant over), I do concede that there are a few of these “Days ” that can help raise awareness about much bigger issues and, of course World Hunger Day is one of them. You can find more out about the aims and achievements of The Hunger Project in some truly inspiring stories on their website.

The 33p price tag per portion does rely on you buying your chillis and mint from a local greengrocer or an Asian/Middle Eastern store (where you’ll undoubtedly do better than those silly little, extortionately priced, supermarket packets). You can use any left overs in an equally economical ginger masoor (red lentil) dal

Chickpea, Chilli and Mint Soup
Serves 4-6Frugal ingredients

You can blend this with a stick blender in the pan if you want to keep the washing up to a minimum, but if you do have the time this becomes beautifully silky and creamy when well whizzed in a blender.

3 tbsp olive oil
2 onions, diced
4 cloves of garlic, finely chopped
2 – 3 red chillis chopped finely
500 g/1lb cooked chickpeas or (less economical) 2 x 400 g/14 oz tin of chickpeas
1 litre/1 1/4 pints vegetable or chicken stock (you can use a stock cube)
Juice of 1/2 – 1 lemon
salt

Plenty of mint leaves, sliced.

Take a large saucepan and fry the onion in the olive oil until golden.

Add the garlic and the chilli then, as soon as you can really smell the sizzling garlic, throw in the chickpeas and the stock.

Simmer for about 10 minutes and then blitz the soup with a stick blender for convenience or, for a smoother result, use a blender.

Taste. The soup will seem rather bland, don’t worry the salt, plenty of zippy lemon juice and the fresh mint will work wonders. Season the soup well and serve.

How about?
Toasting a bit of yesterday’s bread and putting it in the bottom of your soup bowl. Allow the bread to soak up the soup and collapse into a tasty and satisfying gloop – great if you’re really hungry, this also makes the dish a fully balanced, protein-rich meal.

Adding lime juice and coriander instead of lemon juice and mint.

And just a word about the rather twee “Chez Jenny” tablecloth in the finished soup picture – it’s actually one of those ancient roller towels. It’s old and authentic, it just happened to have my name on it. I found it in The Cloth Shop  in Notting Hill, London.
Come on, if there’d been one with your name on it, you wouldn’t have been able to resist either!

A sprout is not just for Christmas

Jenny Chandler Sprouts

We bought our Christmas sprouts on the stalk yesterday, ensuring optimum freshness for our big feast tomorrow. The guinea pigs are already munching on some of the sweet leaves from the sprout top and we’ll have the rest for lunch.

I’ve adored sprouts for as long as I can remember, even as a toddler- along with Stilton cheese. I’d always felt quite proud about my developed palate; early signs of a true food lover, I thought. I recently discovered that a love of bitter, strong flavours as a child could betray the fact that I’m short on taste buds; “super-tasters” (those people with the highest concentrations of taste buds) apparently find most brassicas overpoweringly bitter. So, do I miss out on all sorts of delicate nuances as I eat every day? That may be, but at least it allows me to revel in the delicious possibilities of the Brussel sprout.

It seems tragic that most people only eat their sprouts once a year when there are so many tasty possibilities- so here are my …..

5 favourite ways with sprouts

Simply steamed until JUST cooked through and then tossed in a bit of butter before serving. If you’re using small sprouts there’s no need to cut those little crosses in the bottom; if using large sprouts I cut them in half. Any bacon you might have put over a roasting bird can be chopped or broken up and thrown in too

Roasted sprouts are a revelation. Turn your oven up really high  (200°c +). Toss whole sprouts in olive oil, salt and pepper and then roast for about 10 minutes (more if they’re large ones) or until the outer leaves are a bit charred and the centres are tender.

Stir fried sprouts with orange and chestnuts are heaven with a roast. Slice the sprouts as finely as possible. Take a wok or large frying pan and begin by frying a diced onion in olive oil until soft. Throw in a finely sliced clove of garlic and your sprouts and toss around over a high heat for 2 or 3 minutes. Now add about 1/2 tsp of orange zest and a handful of cooked chestnuts. Give everything a good stir before adding the juice of the orange and seasoning with plenty of salt and pepper.
A few lardons fried up with the onion at the beginning of the dish are fantastic here too.

Brussel sprout Bubble and Squeak is the  absolute best- using any left overs from the sprout dishes above or eve shredding some sprouts for the purpose. Make sure that having mixed them in with your potatoes you fry the mixture with plenty of oil and allow it to catch and caramelise on the bottom of your frying ban. The charred, crunchy bits are the key to a sublime dish, along with plenty of Worcestershire Sauce and a poached egg.

– My new favourite, sprout salad, discovered at a fabulous pop-up in Bristol only last week. If you happen to be a local then make sure that you head down to  Bar Buvette (great write up by Fiona Beckett) on Baldwin Street as this bar may only be around for a few weeks and you REALLY DON”T WANT TO MISS IT!
But back to my sprouts – Peter Taylor (formerly of The Riverstation and Bell’s Diner) was serving very simple cheeses, charcuterie, fab’ cheese toasties  and then this very simple (but incredibly delicious salad) when we went down to sample his wines last week. I don’t think I’d ever eaten raw sprouts before….strange when I love all sorts of variations on coleslaw.
(Peter pointed out that you could always ponce things up and go a bit Italian by calling it a Cavolini or Cavoletti salad).


Sprout, Pecorino and Hazelnut Salad 
(as starter or side dish for 4)

400 g sprouts, peeled and shredded
100 g pecorino or parmesan, grated
Juice of 1 lemon
6 tbsp extra virgin olive oil
A good handful of hazelnuts
salt and black pepper

Toss everything together and season to taste. Great eaten on its own or very delicious with a crispy jacket potato and a bit of cold ham too.

HAPPY CHRISTMAS & I do hope you enjoy your sprouts.


Spilling the beans and a Greek Fava puree

There are so many fabulous hummus-like dips around and yet we seem to be stuck in a rut- don’t get me wrong, I love chickpea puréeé but why not give some of the other legumes a go too. I talked about Moroccan Bessara back in May which I made with fava beans but this month I’d love to share this Greek island fava with you. It is rather confusing as traditional fava is not made with what we know as fava (broad beans) but with split yellow peas instead. I was stirred into action with this one when my mother brought me a packet of the split peas back from her recent holiday in Rhodes. You can use any yellow split pea but if you’re after the real thing you could go to the Ergon restaurant and deli in London or buy their beans on line.

Greek split peas

Greek Fava Purée

200 g/7 oz  yellow split peas, rinsed and drained
2 bay leaves
1 small onion, diced
1 tsp salt
3 cloves of garlic, crushed
5 tbsp extra virgin olive oil
juice of 1 lemon
freshly ground black pepper
2 tbsp capers, rinsed
1 tbsp roughly chopped parsley
A few very finely sliced pieces of red onion.

Place the split peas, bay leaves, the onion and enough cold water to cover everything by a couple of cm in a saucepan. Bring the water up to the boil skimming away any scum or froth.

Now simmer for about 45 minutes, stirring from time to time and, if necessary, adding a little extra water to keep the peas just covered.

Add the salt and continue to simmer until the beans are very tender and almost dry.

Remove the bay leaves and allow the split peas to cool for a few minutes before you puree them with a hand held blender or in a food processor.

Don’t worry, the peas will taste bland and flabby, they will be screaming for seasoning. Add the garlic, extra virgin olive oil, lemon juice, freshly ground black pepper and more salt, if required, until you have a wonderfully balanced puree.

Spoon into a bowl and allow to cool completely, letting the flavours get to know each other.

Serve with a sprinkling of capers, the parsley, red onion and a splash of extra virgin oil.

Try topping the fava with any combination of the following:
Chopped fresh oregano, coriander or parsley
A few chopped Kalamata olives,
Diced tomato and a handful of rocket.
A sprinkling of roasted cumin seeds and sweet Aleppo or Urfi chilli flakes

Greek Fava puree

We’re having the fava with a few olives, a tomato salad and some bread for a really healthy light lunch but do try serving it with some charred squid or cuttlefish.

NEWS –  Spilling the Beans: September 10th at The Folk House Café

I met up with cook and nutritionist Lou Marchionne a couple of weeks ago, only to discover that she’s as excited about pulses as I am. Over the years Lou has cooked at so many of Bristol’s most iconic places such as Rocinantes, Bordeaux Quay and now at The Folk House Café on Park Street. So, after lots of excited chat we’ve decided to have a Pulse night on September the 10th at The Folkhouse ……..I’d love you to come along.

We’re planning an hour-ish cooking demo (using recipes from my book Pulse)  followed by a buffet supper of delicious beany dishes – the menu will include chickpea farinata, a zippy Asian style soup, super healthy sprouted bean, fruit and feta salad, a roasted cauliflower, butter bean and wild rice dish and a smokey pork chilli. The idea is to inspire you with the amazing versatility of legumes, Lou will point out their tremendous health benefits along the way and then you’ll get to eat some very tasty food.

The tickets are an absolute bargain at £8.50 (you will have a great supper – plenty for vegans, vegetarians and the resolute carnivores) The bar will be open, so a great time to catch up with friends. The evening will last from 18.30 to around 22.00.

You can buy tickets HERE. Really hope to see you and your friends.

I’ll be selling my book PULSE on the night and matching the Amazon price of £17 (rrp £25) so do bring along a bit of cash (I don’t take cards) if you are planning to buy a book.

PULSE photographs by Clare Winfield